|
|
|
|
|
|
|
I. CamassCrete CS1000W Low-Profile
|
76 mm ~ 150 mm height
150 mm ~ 200 mm heigh
|
| |
|
CS1000W-76 / CS1000W-100 / CS1000W-150 / CS1000W-200
|
|
|
Cable Trench Capacity by different heights
Inside width: 110 mm (4.33")
Clearance: System height minus 5 mm
|
|
|
System
|
System height
|
Cable Trench width
|
Cable Trench clearance
|
|
CS1000W-76
|
76 mm (3.0")
|
110 mm (4.33")
|
71 mm (2.79")
|
|
CS1000W-100
|
100 mm (4.0")
|
110 mm (4.33")
|
95 mm (3.74")
|
|
CS1000W-150
|
150 mm (6.0")
|
110 mm (4.33")
|
145 mm (5.70")
|
| CS1000W-200
|
200 mm (8.0")
|
110 mm (4.33")
|
195 mm (7.68")
|
|
|
|
| |
|
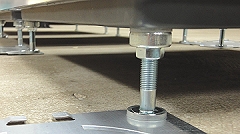
Height adjustment: Self-stand UniPanel
Where there is floor deviation, impact noise might be caused by tip of pedestals. Adjust the pedestals to eliminate noise and deviations.
|
| |
|
|
|
Step 1:
|
|
Loose the lock-nut
Apply the 17 mm wrench to loose the lock-nut at bottom of the pedestal by counter-clockwise
|
| |
|
|
|
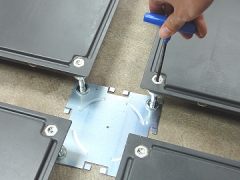
Step 2:
|
|
Adjust height
Apply the 4 mm hex key wrench, stretch at the hex hole at top of the pedestal, to adjust
|
| |
|
|
|
Step 3:
|
|
To fasten
Use the 17 mm wrench again, to fasten the lock-nut by clockwise.
|
| |
|
|
| |
|
|
|
|
4 mm hex key wrench + 17 mm wrench
|
|
|
|
|
|
Step 1 and 3: loose and fasten the pedestal at the lock-nut at bottom
|
|
|
|
|
|
steps 2
Adjust height from top by key wrench
|
|
|
| |
|
Flank Cap with clamping devise (optional) for extra fixing to UniPanel (main panel)
|
|
Central Cap with locking (optional)
|
|
 |
| |
|
|
|
Netfloor,
Inc. All Rights Reserved. |